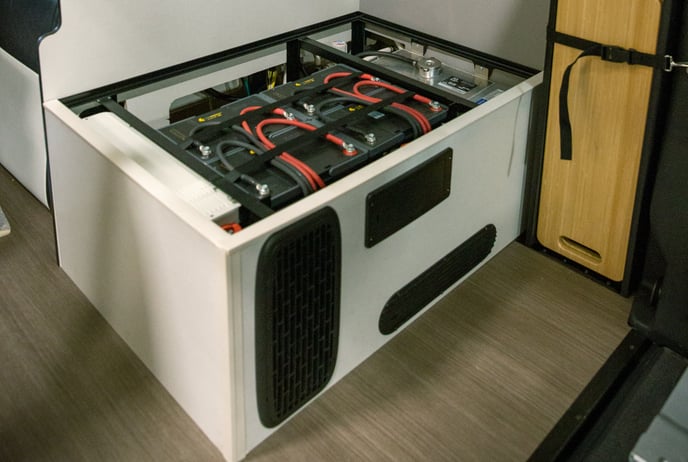
Lion Battery Replacement (1st Gen RoamRig Systems)
How to remove and replace the batteries on your RoamRig 1st Gen Power system (all stages).

Please note that these instructions use images from a power system that is on a work bench for clarity.
DifficultyVery Easy |
Time Needed30 minutes |
Required Tools
|
|
Step 1: Power Disconnect
- Ensure the van is disconnected from shore power
- Remove the breaker access cover on the front of the bench seat. Turn off ALL the breakers. The breaker lever should be in the "down" position.
- These images show a 6 battery (stage 3) system. If you have a 4 battery system (stage 1 or 2), there will be 2 fewer breakers than what the image shows.
Ensure ALL the breakers are off and the van is disconnected from shore power.
Step 2: Battery Access
- Remove the seat cushions on the bench seat to expose the wood cover over the batteries.
- Using a #2 Phillips bit, remove the 4 screws securing the wood panel over the batteries. Save these screws as they will be reused.
- Although it is not shown in the images, take a mental note or a picture with your phone showing the location of the foam on the old batteries. We will need to install the foam pieces onto the new batteries in a later step.
Step 3: Negative Cable Disconnection
- Using a 10mm socket and wrench, remove all of the negative (black) cables from the batteries as shown.
Step 4: Positive Cable Disconnection
- Using a 10mm socket and wrench remove all the positive (red) cables from the batteries as shown.
Step 5: Battery Removal
- With both the negative (black) and positive (red) cables disconnected, drape the cable assemblies over the front of the bench seat as shown.
- When you are removing the batteries, ensure to keep the old and new batteries separated from each other to avoid confusion when reinstalling the new batteries. You can use tape to label the old batteries if needed.
- It is easier to start with one of the middle batteries if you have a 6 battery system (as shown). Simply lift up the handles on the battery, and pull the battery out.
- Proceed to remove the remaining batteries and set them aside.
- The pieces of foam are not shown on the old batteries in these images. You will need to gently peel the foam off the old batteries before sending the batteries back. New foam pieces will be installed on the new batteries.
Step 6: New Battery Prep
- The new Lion batteries will have these stand off posts threaded into the positive and negative terminals on the battery, You will need to remove these posts by unthreading them counter-clockwise. You can use an adjustable wrench or pair of pliers. Take care to not have a tool touch both the negative and positive terminal at the same time!
- If the stand off post does not unthread and wants to spin the battery terminal when you try to loosen it, you must STOP immediately!! Damage can be caused to the battery!! Contact RoamRig before proceeding!
- You can discard the stand off posts, as they will not be reused.
Step 7: Battery Reinstallation
- The housing of your new batteries is slightly larger than before. Use a pair of pliers to remove the divider tab between the front and middle set of batteries. It should come out easily as they are just tac welded in place.
- Start placing the new batteries into place. You want the negative (black) terminal on the left if you are looking at the bench seat from the front.
- If you have a 4 battery (stage 1 or stage 2) system you will place the 4 batteries towards the front (where the breaker panel is) of the power system. The two battery locations towards the rear (closest to the shower wall) will be left empty.
Step 8: Positive Cable Connection
- Carefully drape the battery cable assemblies back over the new batteries. Ensure the wires are not twisted.
- Using the same bolts as previously removed, reconnect the positive (red) cables to the positive (red) terminal on the battery. Tighten the bolts snug, but do not over tighten.
- The battery bolts need to be snug, but be VERY CAREFUL as to not over tighten them. You can damage the battery terminal if you over tighten the bolt!
Step 9: Negative Cable Connection
- Using the same bolts as previously removed, reconnect the negative (black) cables to the black (black) terminal on the battery. Tighten the bolts snug, but do not over tighten.
- The battery bolts need to be snug, but be VERY CAREFUL as to not over tighten them. You can damage the battery terminal if you over tighten the bolt!
- With both positive and negative cables reconnected, gently peel the foam off the old batteries. Place the foam in the same locations on the new batteries.
Step 10: System Turn On
- With all the battery cables secured and tightened, you can turn on all the batteries by pressing and holding the power button on EACH battery for approx. 5 seconds. Ensure the status lights on the battery light up.
- Once the batteries are turned on you can turn all the breakers on in front of the bench seat.
- Place the wood cover back onto the batteries, and secure using the 4 Phillips head screws previously removed. Reinstall the cushions.
- The batteries need a full charge. Keep in mind the SOC % reading on the Victron gauge will need to be recalibrated via a full charge, either from shore power or a long drive.
