
RoamRig’s goal is for you to worry less, and enjoy more. With your upgraded power system, there will be changes to how you operate and enjoy your Revel. Start here to get acquainted with your upgrade. We’ll cover the control panel, how to use your inverter and best practices for using your system.
If you have not already, first learn about Battery Monitoring for your new power system and read about the components that have been upgraded.
What should I do differently on my first RoamRig adventures?
- Worry less, enjoy more! Use RoamRig and enjoy the power boost. You cannot break anything by using it wrong.
- Start using RoamRig with your Revel and get acquainted on your own. Note any questions that come up. After at least a few days (or weeks) of learning the RoamRig system on your own, please create a support ticket if you need any assistance.
- Please do not download manuals for the components in the system! They are not needed. We’ve already programmed every component so that you do not need to adjust any settings before hitting the road.
Control Panel
The Control Panel includes features and subsystems which are separate from but connected to RoamRig’s operation. Here you’ll find the House Battery switch (previously located near the steps), Victron battery monitor gauge, heater controls, inverter switch and more.
Switches
Your new control panel looks like this. All switches are labeled! Some switches are directly related to your RoamRig power system and others are rolled over from your existing system.
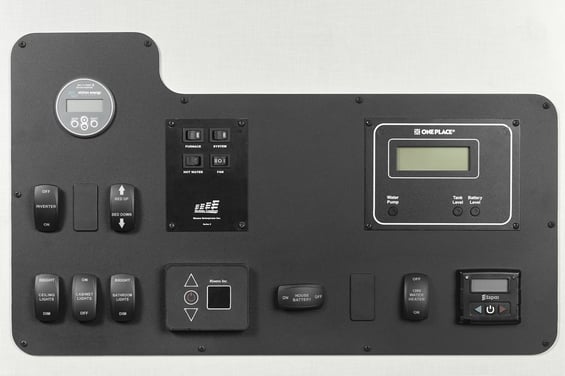
The following controls are directly related to your RoamRig power system:
- House Battery
- Inverter
- Victron Battery Monitor
- Heater
These controls have been rolled over from the existing system:
- Light switches –Your new light switches are now clearly labeled to their corresponding lights! Hooray!
- Bed Switch – Your bed switch no longer requires a key and works as long as the house battery switch is in the ON position.
- One Place – do not use this for battery level or chassis battery voltage, instead refer to the Victron gauge. The water pump and tank level functions can be used as before.
House Battery
This switch used to be by your sliding door. To use the system, turn the house battery switch on. It controls the 12v loads to everything in your van: lights, fridge, heater, etc. When the house battery switch is off, it is normal for the Victron battery gauge and Espar code reader to be on.
Turn house power off when storing the van with no charge source. It doesn’t hurt to turn it off when storing with a charge source, but it isn’t necessary if the charge source can sustain a constant load from the fridge and other 12v consumers that may be left on.
Inverter
Your inverter both powers 120v outlets/accessories AND charges your house batteries when connected to shore power. To charge, you do not need to flip the switch. It will automatically come on when plugged into shore power and will turn off when shore power is disconnected.
Use the switch to turn on the inverter when you are running on battery power:
- Inverter on: turn on the inverter to run the AC, cooktop or use the power outlets.
- Inverter off: turn the inverter off when not in use. Leaving the inverter on will drain the batteries completely after several days.
Read more about your inverter here.
With your upgrade, you received an inverter remote (all stages) and magnetic screwdriver (stage 2 and stage 3 only). Keep these accessories in the van at all times. If you have an issue on the road, you may be unable to diagnose it without the inverter remote control.
Watch our video to identify these accessories:
Victron Battery Gauge
Use the Victron Battery Gauge and Victron Connect App to monitor the real-time status of your RoamRig power system. Do not use the One Place to check your batteries anymore. Learn more about monitoring your batteries below.
Heater Controls and Thermostat
We’ve added a Rixen 4 switch panel in addition to the thermostat. Use these settings to operate your heater and hot water heater when not connected to shore power:
- System: Leave the System set to “ON” (1 or | is On) 100% of the time and ignore it.
- Furnace: Leave set to “ON” (1 or | is On) 100% of the time
- Fan: Leave the Fan set to II 100% of the time and ignore it. This switch tells the system to turn the fans on if there's a request for heat via the “Rixens Inc” thermostat directly below.
- Hot Water: Set this switch to “ON” when you want to have hot water. Turn it off when hot water is not needed.
The Rixen Thermostat controls the air temperature in the van. When the System switch is on, the thermostat will be on.
To turn on heat, press the power button on the thermostat. The temperature next to “heat” on the display is the temperature the system is set to. Change it by first holding the up or down arrow until the set temperature on the screen turns from blue to white. Then adjust the temperature with the arrows.
The Espar Controller in the lower right of the control panel is only used for diagnosis. Do not use it to set temperature or turn heating on and off. It is off when the system is on, and on when the system is off.
Read the full guide on using the Rixen Heater with the RoamRig modifications.
120V Water Heater
This switch is separate from the Rixen 4 switch panel. Use this switch to run your hot water heater when connected to shore power. It cannot heat water via the house batteries.
Power Monitoring
On the Victron gauge, use the +/- buttons to scroll between screens. State of Charge (SOC) is the primary thing to monitor. However, voltage must be used in conjunction with SOC to determine if SOC is incorrect:
- SOC, shown as a percentage, is an estimate of how full your house batteries are. It is usually correct, but inaccuracies with the estimate can accumulate over time and lead to SOC being wrong. This is called drift, which we’ve described in detail here.
- Main Voltage refers to the house batteries. Check voltage to confirm that SOC can be trusted: if main voltage is less than 12.2V then you are almost out of power and you must ignore SOC, which has drifted, and charge right away.
The batteries are fully charged ONLY when ALL of these conditions are true:
- 100% SOC
- Main voltage is 13.6 or higher
- Amps are between –25 and +25
- The engine has been running for at least 5 minutes OR you’re connected to shore power.
The best way to maintain your system (and avoid drift) is to fully charge regularly.
In the past, you may have used voltage as an indicator of how full your batteries are. In a lithium system, you cannot solely rely on voltage.
Read our Victron Battery Monitoring Guide for more about monitoring.
Operating in Cold or Hot Temperatures
Temperatures below 32ºF can affect your system. So, we advise leaving the interior heat on when using the van in the cold.
The batteries have built-in safety features to protect them from cold-weather damage. They will NOT charge if they are 32ºF or colder and they will NOT power any components if they are -4ºF or colder. When they warm up, they will wake up and act normally. Learn more about cold-weather use here.
When it's hot out, we know that the AC is important. The BEST way to get extended run time is to block off parts of the van so you are cooling a smaller volume. Many variables that can affect AC run time when powering it with your batteries. And there are other tips to keep in mind when plugged into shore power. Read our advice about hot weather use here.
Storing Your Van
Not everyone is on the road all of the time. When your van won't be used, the most robust way to store your van is to power down the batteries and turn off the breakers. Check out this page for tips when storing.
Now that you’re familiar with how to use your system, check out our YouTube playlists to get hands on: Power System Overview and Power System Deep Dive.